
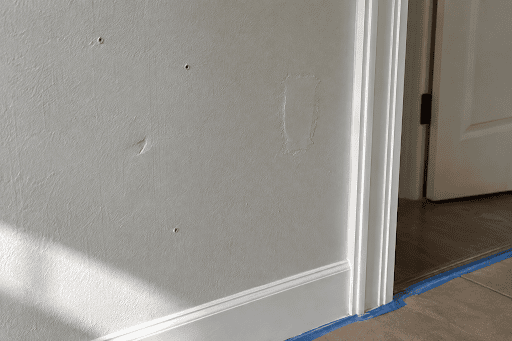
Have you ever painted a room only to notice dents, cracks, ridges, or old patches more clearly once the new paint dried?
You’re not alone. Fresh paint can give a room a cleaner appearance, but it can also draw attention to imperfections that were less noticeable before. Before choosing a new color or finish, it helps to look closely at the condition of the walls and determine what preparation should be included in the painting project.
At Marc Poulos Painting & Decorating, wall preparation is part of the conversation from the beginning. From filling nail holes to assessing older plaster and previous repairs, we can help you understand what your walls need and what preparation is included before painting begins.
Start With the Condition of Your Walls
Before thinking about paint colors, take a few minutes to inspect the surfaces you want painted.
Look at the walls from different angles and under both natural and artificial light. Light coming across a wall from the side can make dents, ridges, drywall seams, and uneven repairs much easier to see.
Pay particular attention to high-traffic areas, walls where pictures or shelving have been removed, and surfaces that have been repaired in the past.
Older homes may also have plaster walls that require a different approach than newer drywall. If you notice cracking, loose material, or areas that appear damaged, point them out during your painting estimate.
The goal is to understand the existing surface before deciding how it should be prepared.
Why Fresh Paint Can Highlight Wall Imperfections
Many homeowners expect a fresh coat of paint to conceal small flaws. In reality, paint follows the surface underneath it.
If a wall has dents, ridges, uneven patches, or poorly blended repairs, those variations can remain visible after painting. Depending on the lighting and paint finish, they may even become more noticeable.
This is particularly common when sunlight from a window travels across the wall or when overhead and wall-mounted lighting creates shadows along the surface.
A smooth, properly prepared surface provides a better foundation for the finish coats. That’s why preparation is such an important part of an interior painting project.
Common Wall Problems to Address Before Painting
Different homes present different preparation needs, but several issues appear frequently.
These may include:
- Nail and screw holes
- Hairline cracks
- Dents and impact damage
- Peeling or loose paint
- Uneven previous repairs
- Visible drywall seams
- Damaged or cracked plaster
- Rough patches
- Failed caulk around appropriate transitions
- Stains or discoloration that may require additional attention
Not every imperfection requires the same repair. A small nail hole is very different from loose plaster or recurring cracking.
During your estimate, show the painting contractor the areas that concern you and ask how each condition will be addressed within the proposed scope.
What Wall Preparation May Include
Wall preparation depends on the existing surface and the condition of the room.
Depending on the project, preparation may include filling holes, patching appropriate cracks or damaged areas, sanding rough repairs, removing loose material, cleaning surfaces, caulking suitable gaps, and priming where necessary.
Previous repairs may also need attention. A patch can be structurally sound but still remain visible because its texture or edges don’t blend well with the surrounding wall.
The preparation plan should suit the actual condition of your walls rather than applying the same process to every room.
It’s also important to distinguish cosmetic preparation from conditions that may require additional investigation. Painting can improve the appearance of a properly prepared surface, but it doesn’t correct the underlying cause of recurring moisture, structural movement, or other building problems.
Older Plaster Requires Careful Evaluation
Homes in Arlington Heights and surrounding communities may contain plaster walls or a combination of older and newer wall materials.
Plaster can develop cracks, chips, loose areas, or previous repairs over time. These surfaces shouldn’t automatically be treated exactly like modern drywall.
If you’re unsure what type of wall you have, mention the age of the home and any repairs you know have been completed previously.
The condition of the plaster should help determine what preparation is appropriate before painting.
This is another reason an in-home estimate can be useful. The contractor can see the actual surfaces instead of trying to determine preparation requirements from room dimensions alone.
Why Primer Matters After Repairs
Primer can serve several purposes during an interior painting project.
Repaired areas may absorb paint differently from the surrounding wall. Without appropriate preparation, those differences can sometimes show through the finish as uneven color or sheen.
A suitable primer can help create a more consistent surface over repairs and other areas that require it.
Primer may also be appropriate for bare surfaces, certain stains, adhesion concerns, significant color changes, or as part of a particular coating system.
That doesn’t mean every wall automatically requires the exact same primer application. The existing surface, repairs, previous coatings, and selected paint system should guide the decision.
Ask which areas will be primed and why so you understand the preparation included in your project.
Choose Paint Finish With the Surface in Mind
Paint finish can affect both the appearance and practical performance of a room.
Lower-sheen finishes generally reflect less light, which can make minor surface variation less noticeable. Finishes with more sheen reflect more light and may make some imperfections easier to see.
That doesn’t mean the lowest sheen is automatically right for every room.
Consider how the space is used, how frequently the walls are touched or cleaned, the amount of natural light, and the manufacturer’s recommendations for the particular paint product.
For example:
- Lower-sheen finishes may help minimize the appearance of minor surface variation.
- Eggshell provides some sheen, with cleaning performance depending on the specific product.
- Satin reflects more light and may reveal additional surface variation, while its performance characteristics depend on the selected coating.
The condition of the walls and the demands of the room should both be considered when choosing the finish.
Look at Repairs Under Different Lighting
Lighting can dramatically change how a painted wall appears.
Before and after preparation, view important walls from several positions in the room. Natural daylight, lamps, recessed lighting, and other fixtures can reveal surface variations differently.
Walls beside large windows can be particularly revealing because strong directional light may travel across the surface.
This doesn’t mean every wall can or should be made visually perfect under every possible lighting angle. Instead, discussing existing conditions and expectations beforehand can help establish what preparation is appropriate for the project.
Include Trim and Adjacent Surfaces in the Conversation
Walls aren’t always the only surfaces showing wear.
Freshly painted walls may make chipped baseboards, worn door casings, yellowed ceilings, or previously painted trim more noticeable.
During the estimate, look at the room as a whole and decide which surfaces should be included.
If trim remains in good condition, it may not need repainting. If it is worn or damaged, including it in the project may create a more consistent finished appearance.
The same applies to ceilings and interior doors.
Establishing the scope before work begins prevents uncertainty about which surfaces are supposed to receive preparation and paint.
Experience Shows in the Preparation
A finished room is the result of more than the final coat of paint.
Surface evaluation, repairs, sanding, cleaning, priming, protection, and careful application all contribute to the appearance of the completed project.
Your estimate should explain the preparation behind the finished color.
Ask how existing patches, damaged areas, changes in texture, and other visible concerns will be handled. That gives you realistic expectations for your own walls instead of relying on the assumption that fresh paint will automatically conceal every imperfection.
At Marc Poulos Painting & Decorating, we make surface preparation part of the project discussion so you understand the work that comes before the new finish.
Frequently Asked Questions
Why do my walls look worse after painting?
Fresh paint can change the way light reflects across a wall. Dents, cracks, drywall seams, ridges, and uneven previous repairs may therefore become more noticeable if they weren’t addressed before painting.
Can paint hide damaged plaster?
Paint cannot repair damaged plaster. The affected area may need patching, stabilization, smoothing, or further assessment before painting, depending on its condition.
Is primer always necessary?
Not necessarily. Primer may be appropriate for bare or repaired surfaces, stains, adhesion concerns, significant color changes, or as part of a selected coating system. The surface condition and paint system determine the appropriate approach.
Can old drywall patches be repaired before repainting?
In many cases, visible previous repairs can be evaluated and additional preparation may improve their appearance. The appropriate work depends on the condition and texture of the existing repair and surrounding wall.
Does paint sheen affect how smooth my walls look?
Yes. Higher-sheen finishes generally reflect more light and may make surface variation more noticeable. Finish selection should also account for the room’s use and the performance of the specific paint product.
How much preparation will my walls need?
Every home is different. Preparation depends on the condition and material of the walls, previous coatings and repairs, and the desired finished appearance. An in-home evaluation provides a better basis for determining the appropriate scope.
Beautiful Walls Begin Before the Paint Goes On
A carefully finished room starts with understanding the surface underneath the paint.
Addressing appropriate imperfections, preparing the walls carefully, selecting primer where needed, and choosing a suitable finish can contribute to smoother-looking walls and more consistent color.
If you’re planning interior painting in Arlington Heights or the surrounding northwest suburbs, schedule a free in-home estimate with Marc Poulos Painting & Decorating. Show us the areas that concern you, and we’ll discuss repairs, surface preparation, protection, primer, and finish choices before painting begins.


